
How to Apply Eyeshadow like a Pro: From Everyday to Glam with Expert Guide
Your eye shape
Eye color
Must-have brushes guide
Perfect makeup application
Our expert tips
Top 10 Mistakes
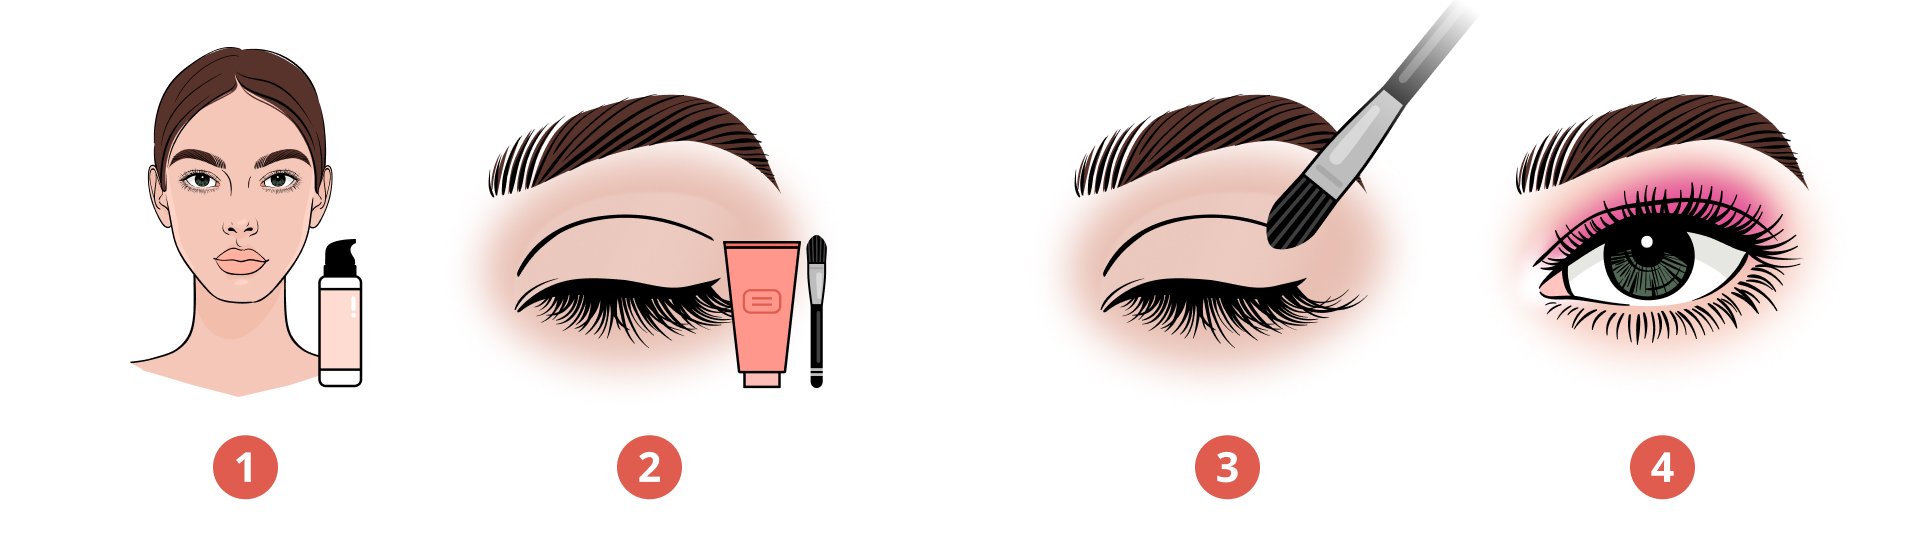
A step-by-step guide for correct eye makeup application.
When it comes to eye makeup, the main desire is to attract attention to the eye, making your art (and natural beauty) stand out!
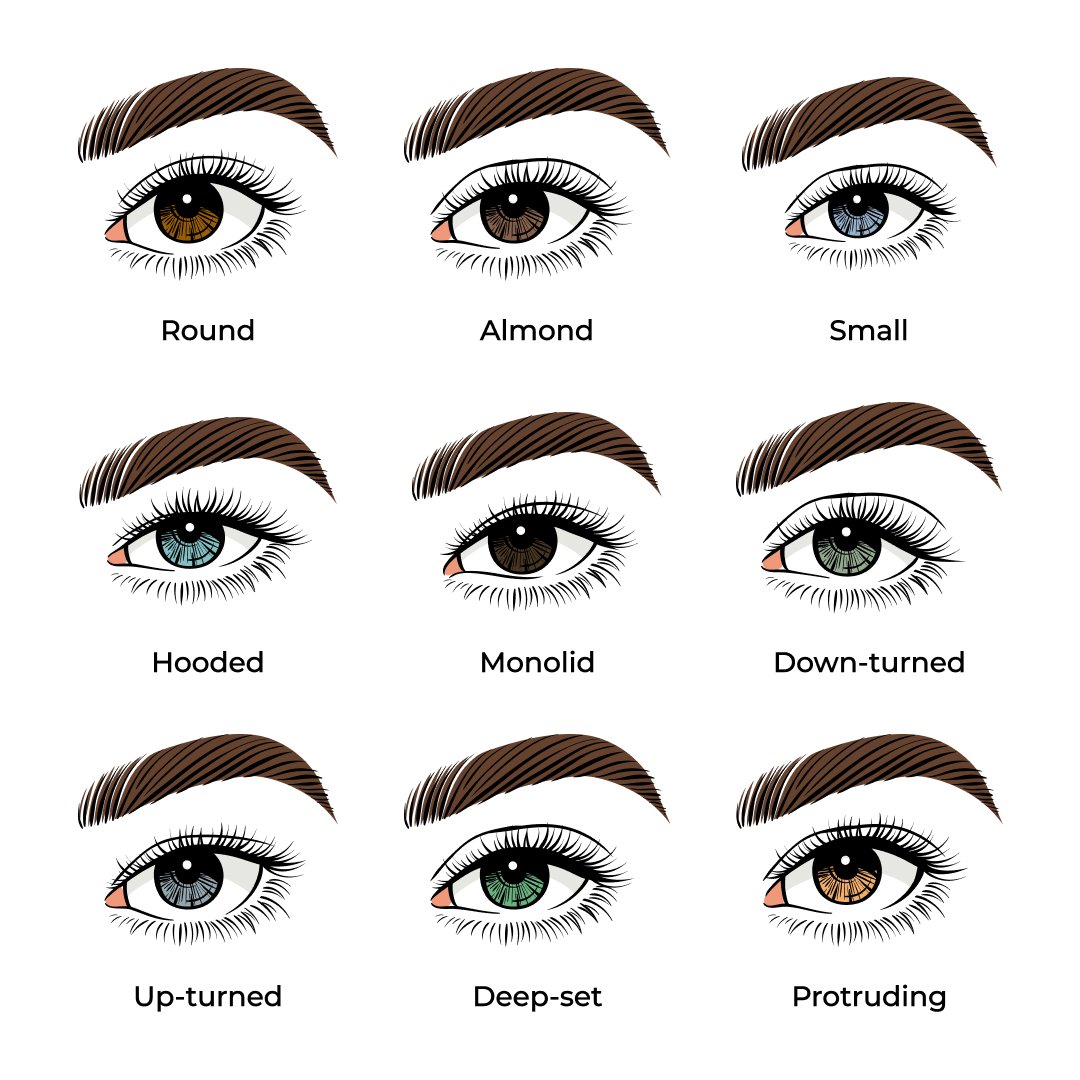
The main element you will have to take into account first will be the eye shape.
It took me a while to understand why a certain makeup look doesn't look as good on me as on someone else. The reason? I have deep-set eyes, and for example, I was attempting to create a makeup look that was modeled on a girl with almond-shaped eyes. This attempt resulted in my prominent brow bone creating shadows in the areas where I didn't want these shadows to be, which made my version very different from what I was trying to replicate. This example was a long time ago, when I first started my journey into professional Makeup Artistry, and I have come a long way since then – and I’m eager to share these important tips for achieving your best eyeshadow application with you!
Step 1
First, you will need to determine the eye shape you are working with before beginning the makeup application. There are several eye shapes: round, almond, monolid, hooded, small, protruding, downturn, upturn, and deep-set eyes. When you’ve confirmed the correct shape you are working with, you can move on to the next step.
Step 2
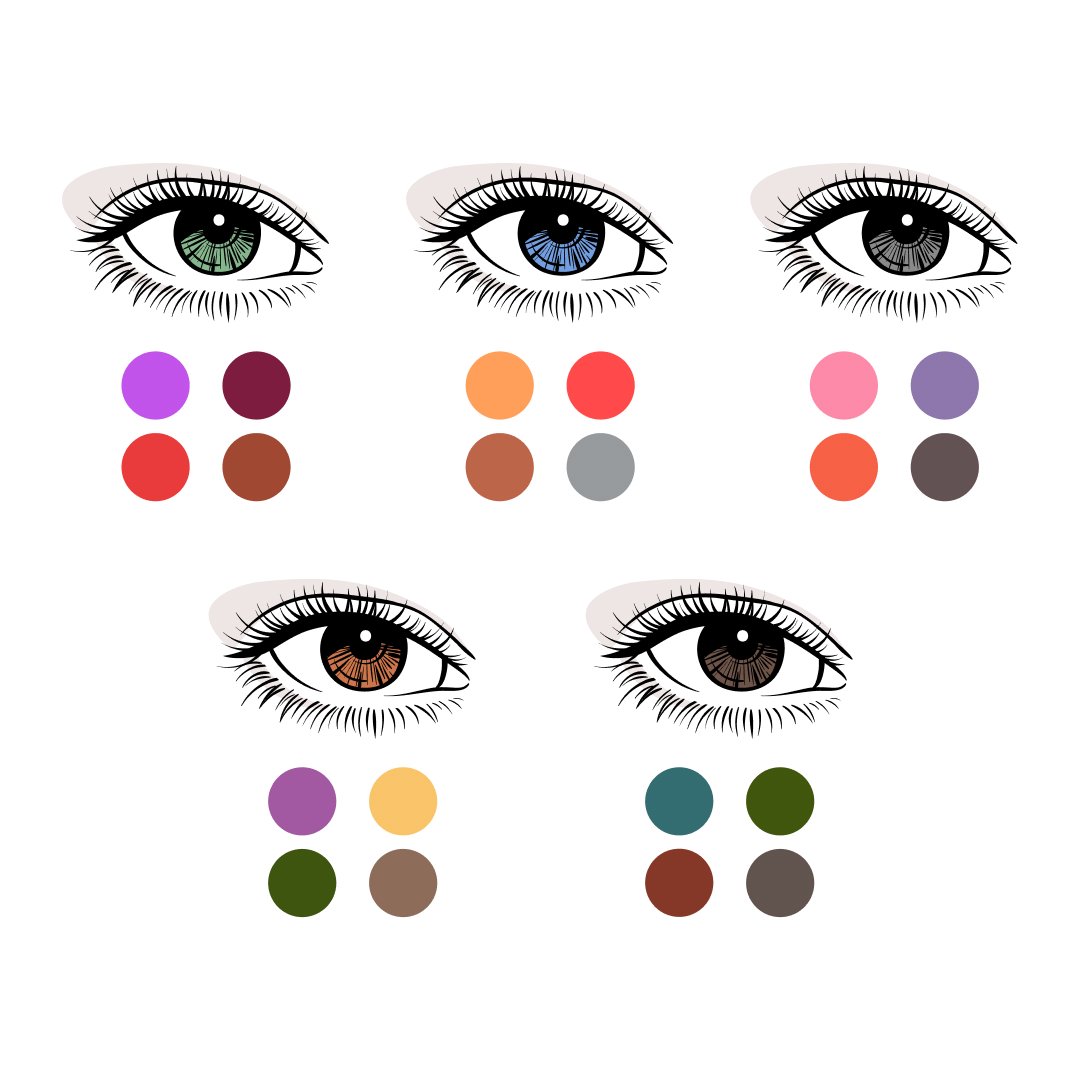
The eye color you are working with on your client (or on yourself) is also an important factor in choosing the right eyeshadow color. Depending on the eye color, some colors can make you look tired, while others will make your eyes look bright and sultry. You always have to use products that compliment your eye color. For example, for blue eyes, choose oranges, reds and warm browns. For green eyes, purples, burgundy and warm browns or red colors are the ones that will make your eyes pop. For brown eyes any eyeshadow color is destined to look great!
Step 3
If you want the eye makeup to be perfect and professional – you will need to ‘invest’ in some great brushes. There are a ton of brushes on the market right now (and luckily, they really don't have to be very expensive!); Morphe Brushes, E.L.F, or Real Techniques have really good quality affordable brushes! The other plus? You won’t need to have a ton of brushes, it will be enough to have 4-5 varying brushes to apply eye makeup.
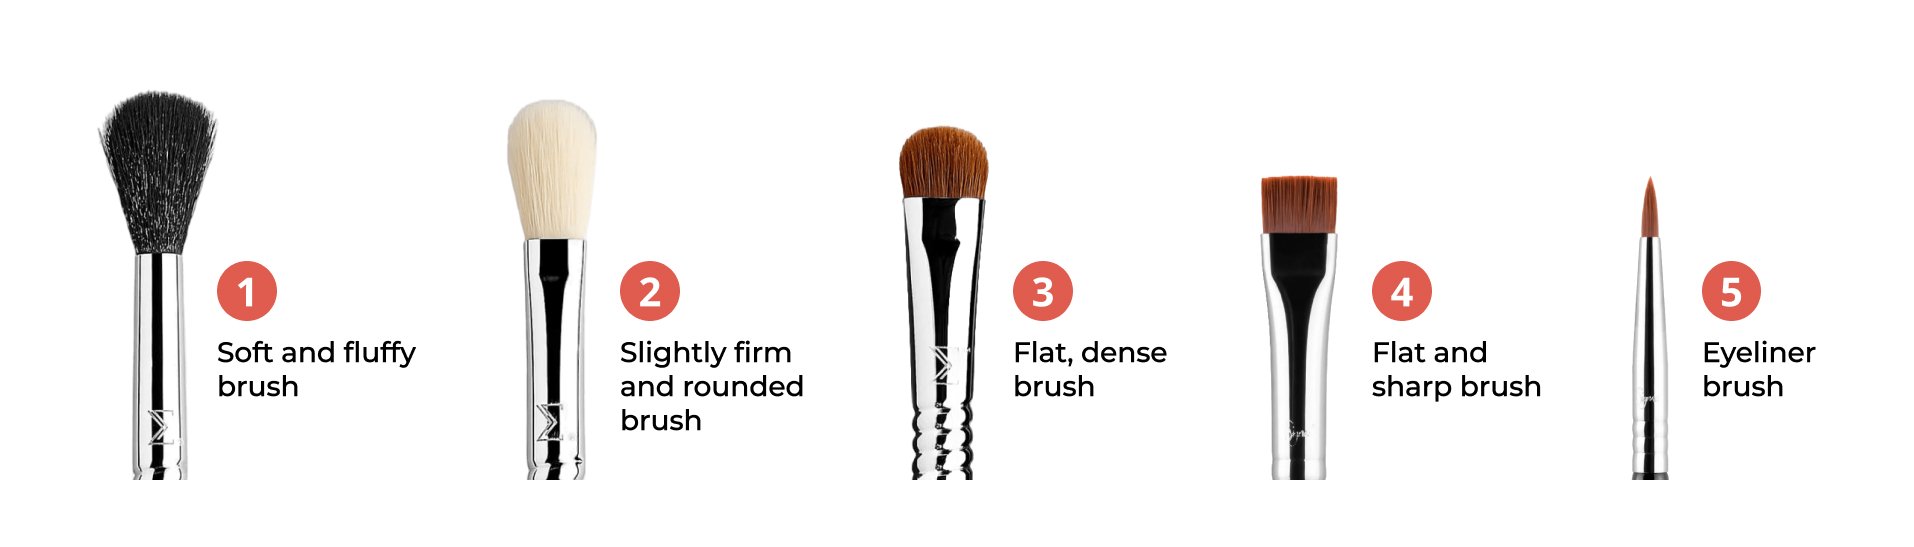
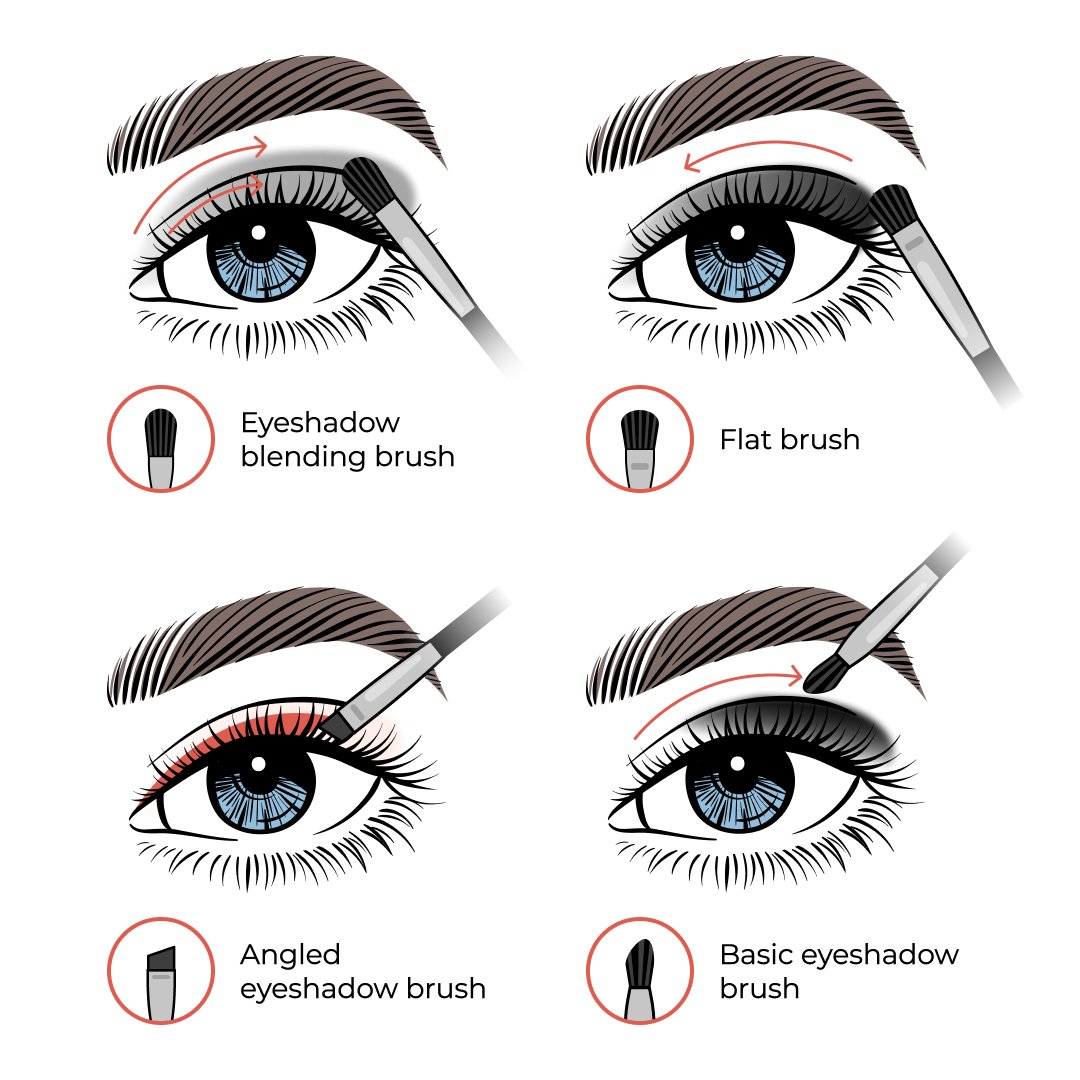
The soft and fluffy brush is for creating shadows i.e., dimension in the crease, and for blending.
A slightly firm and rounded brush is for a more controlled eye shadow application and blending.
A flat, dense brush is for applying pigmented color onto the lid.
A flat and sharp brush is for precise application (you can use it for highlighting your inner corner and brow bone, or for defining your lower lash line, or even for tight lining and eyeliner application.
Eyeliner brush, which is the primary option that can be used for tightening and eyeliner application.

When you have answered all of the above questions (you know the eye shape, you’ve chosen the right eyeshadow color(s) for the eyes, and you have brushes on hand), here comes the most interesting, creative, and fun part—makeup application!
Below are some tips for a perfect eye makeup application, an example of a professional classic smokey eye:
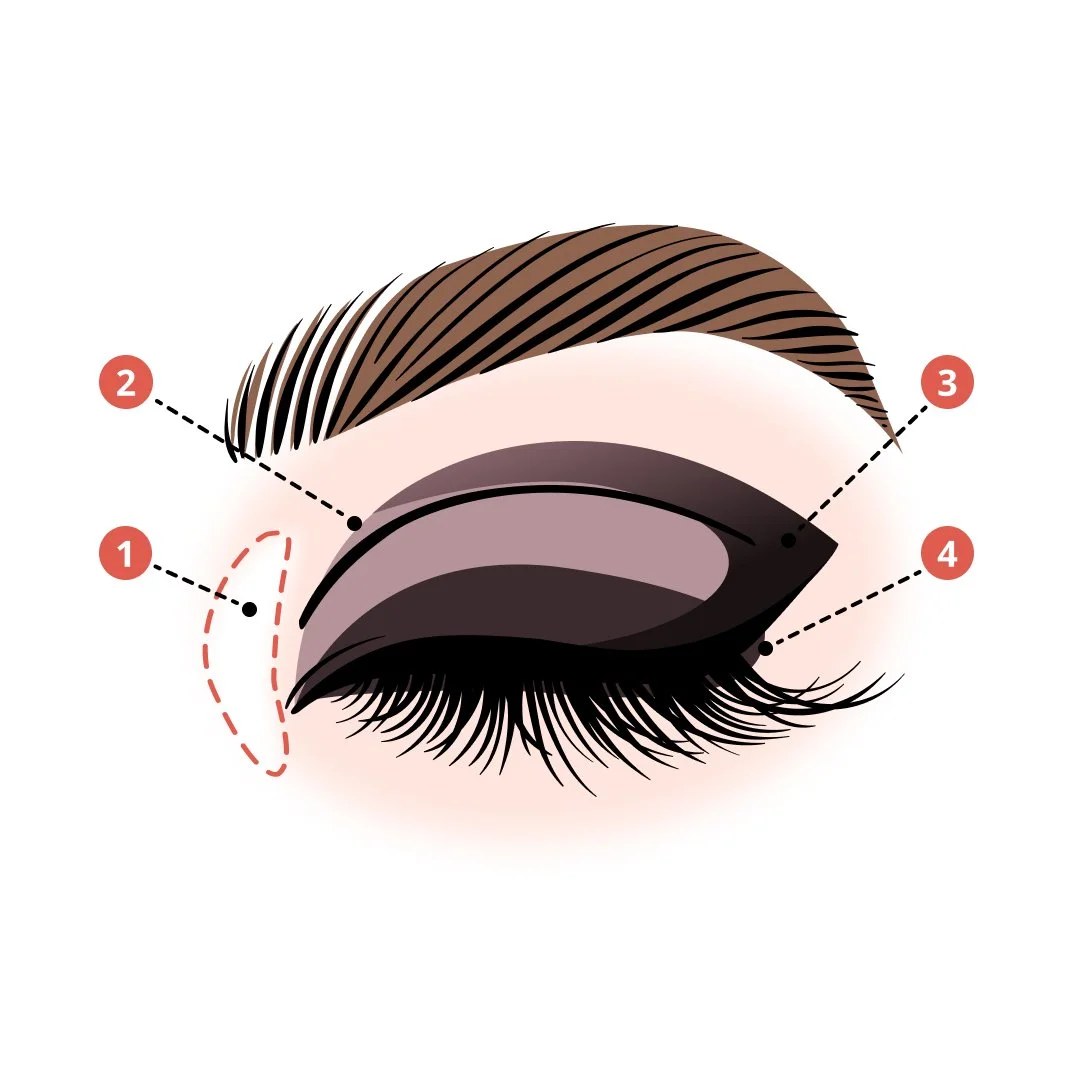
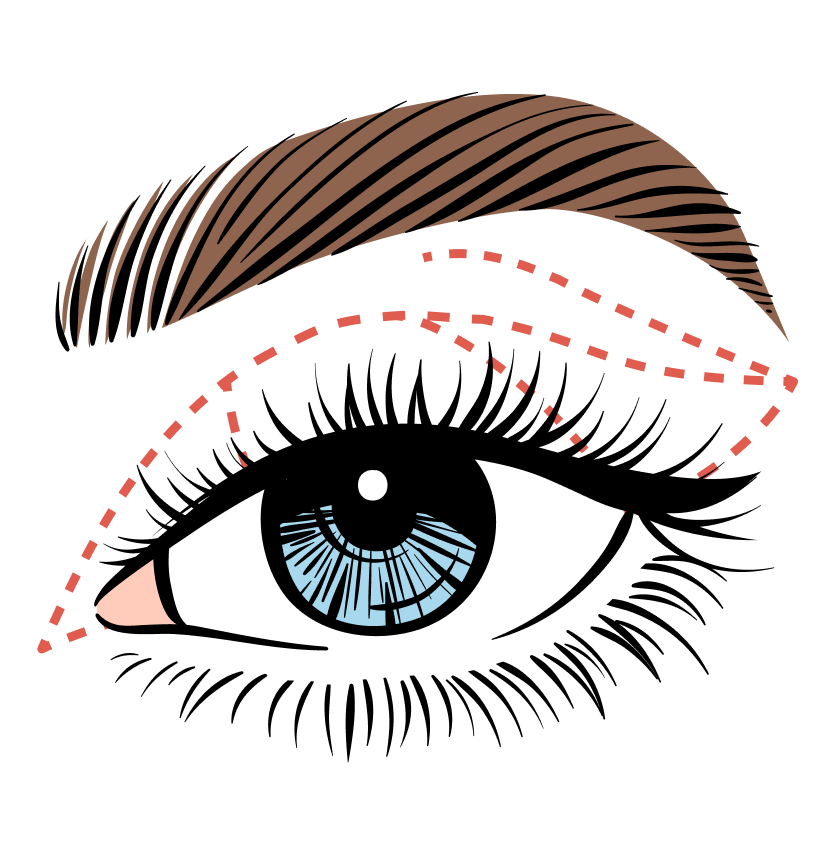
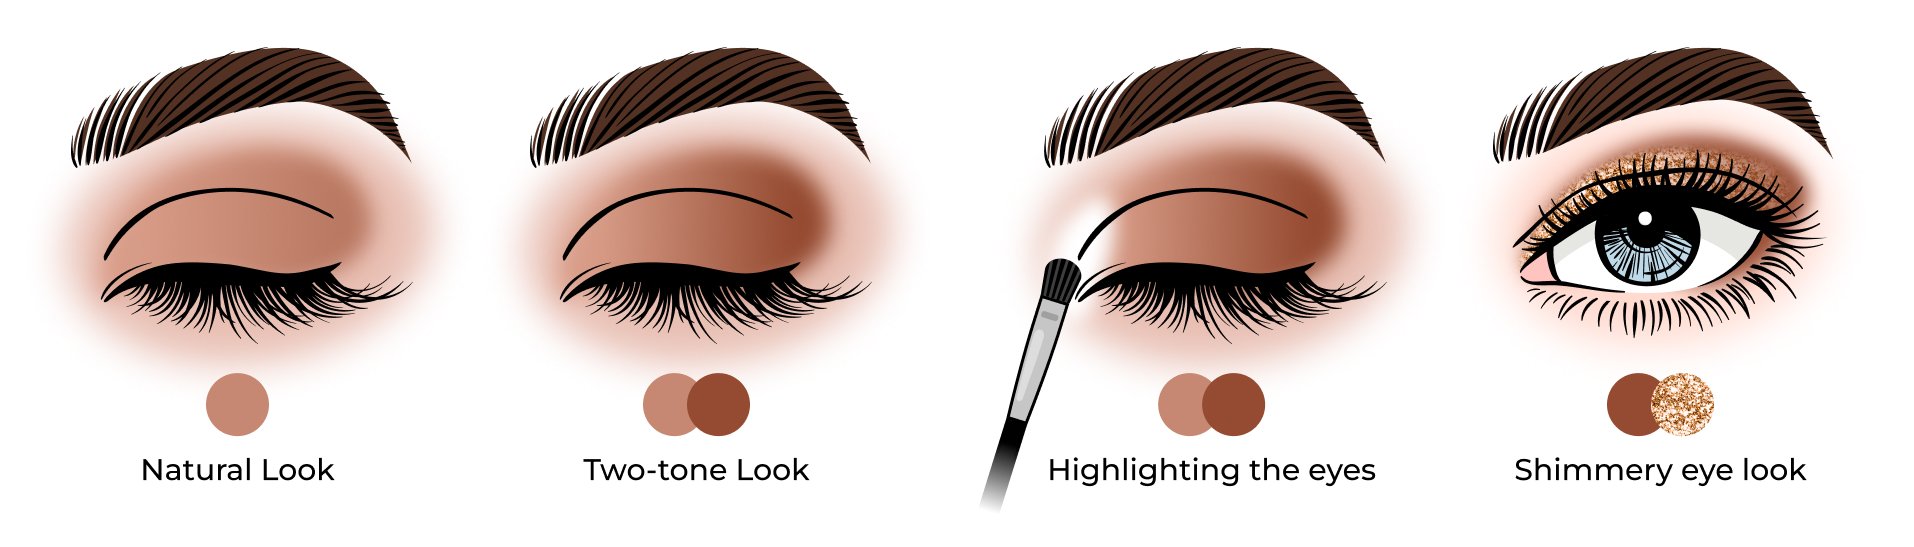
1. Pay attention to the inner corner of your eye, which always should be a slightly lighter highlight to “open up” your eyes.
2. Medium eyeshadow on the lid and dark eye shadow in the outer corner.
3. Or you can even skip the medium and apply a dark eyeshadow to the outer “V.”
4. The same goes with the lower eyelid: light-medium-dark.
The brow bone has to also be gently highlighted
The brow bone has to also be gently highlighted to “lift” the brow and to create an illusion of a bigger eye. This is a classic technique that works for all eye shapes. Again, light-medium-dark.

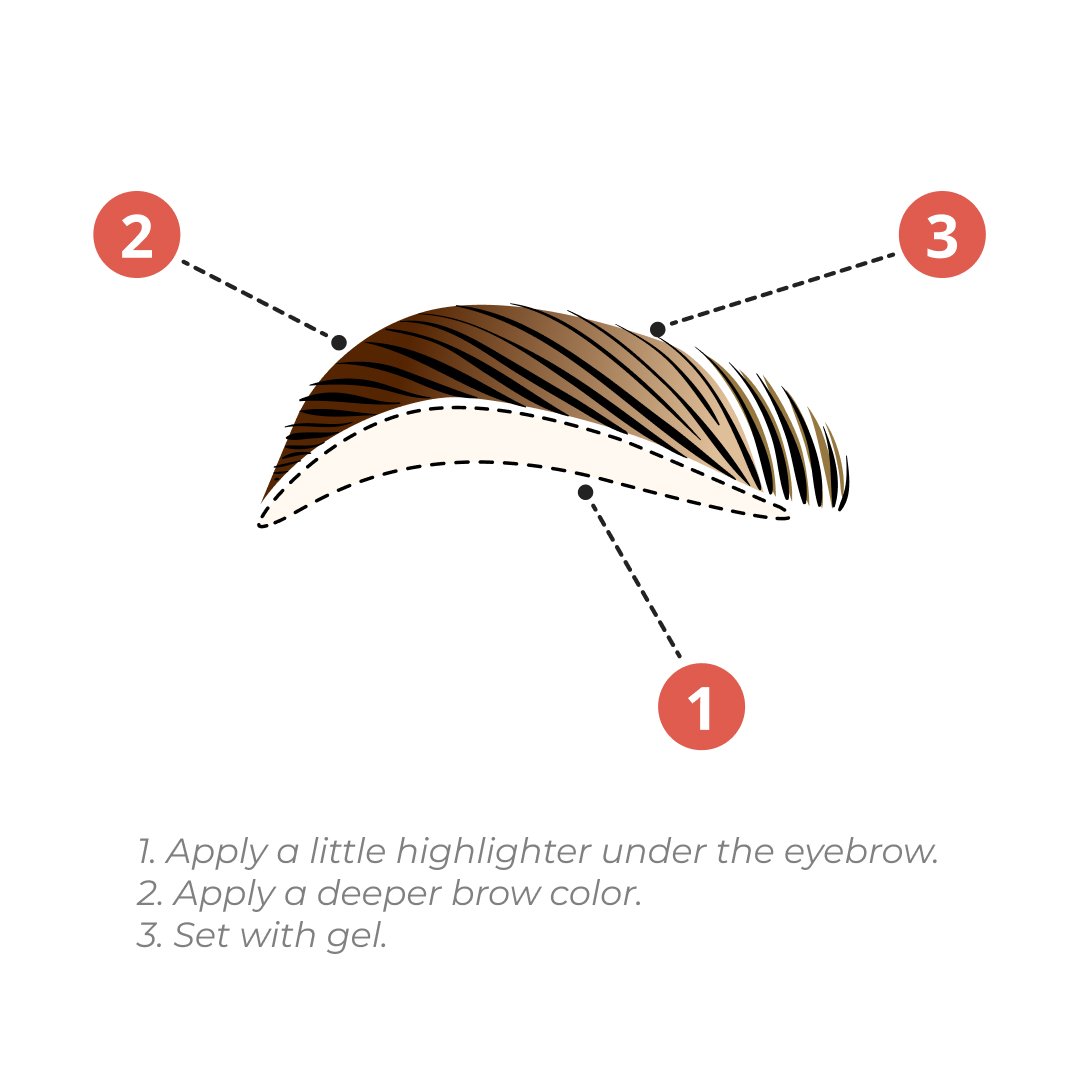
The first tip is to use primer!
Always! This will even out the skin color of your eyelids if you have veins or discoloration, it will make the payoff of the eyeshadow color and pigment much better and it will make your eyeshadows stay the whole day without fading. The benefits of an eyeshadow primer are truly endless!

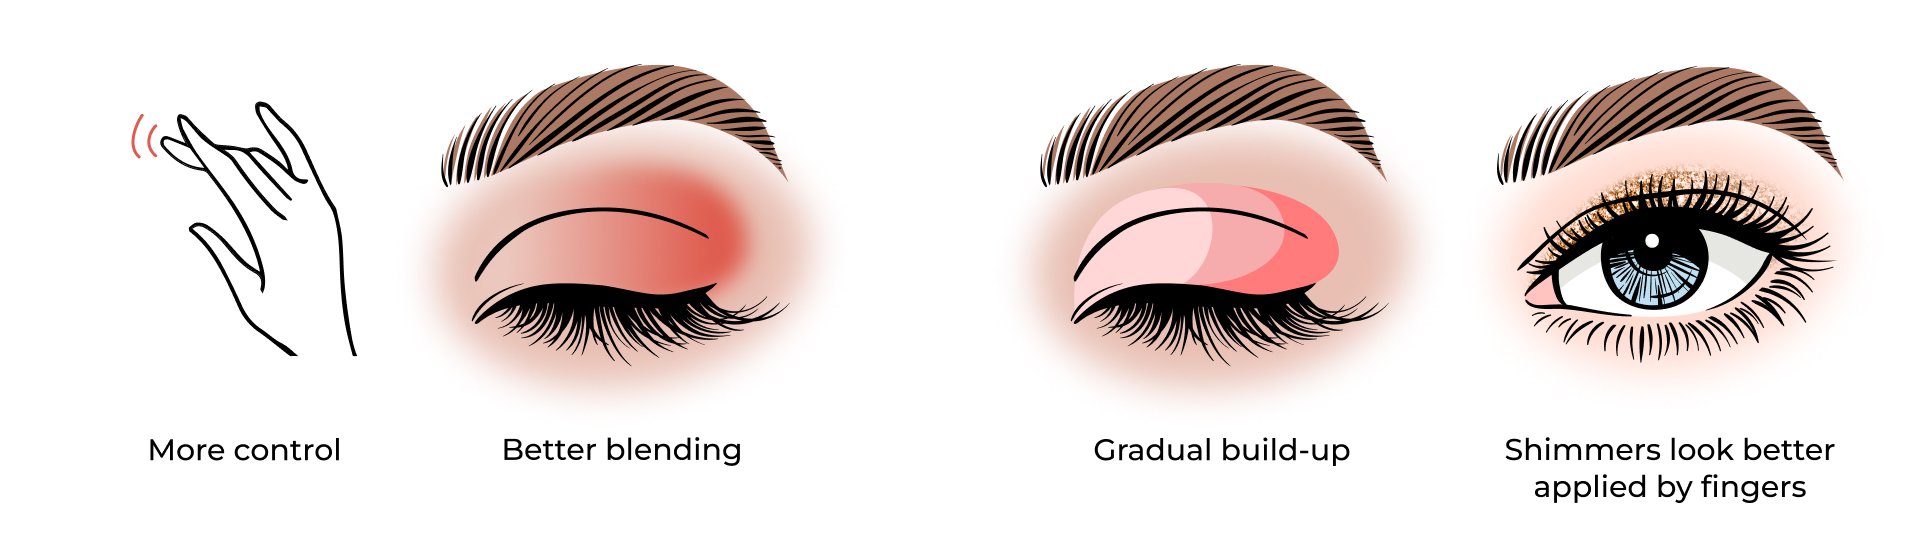
Always use a light hand
when applying eyeshadows onto the crease
I think this tip is the most important! It will prevent your eye makeup from cracking and it will make your blending more diffused. Take the brush closer to the end of the wand as it will lessen the pressure on the bristles and thus will make the eyeshadow application appear more delicate.

You should always go from the lightest shade to the darkest in the crease!
Prep your crease with the light brown eyeshadow first and then take medium brown and then dark brown or even black eyeshadow. Prepping your crease with a lighter shade will make it easier for you to blend the darker shade later. You can even blend in between each eyeshadow application with a clean brush to make the blending appear more professional.

For monolids (such as Asian eyes) you will have to create a crease yourself and the steps going from lighter to darker eye shadow will be incredibly helpful.
The darker eyeshadow, the smaller the brush should be. This will make your application more precise to the areas which need to be darker to emphasize your eyes (outer corner, for example). Smaller brushes will give you more control and this is exactly what you need when working with a darker shade.

Don’t apply too high on your upper eyelid or too low on your lower eyelid with dark eyeshadows. This exception is if you are looking to achieve a ‘messier’ look with your eyeshadow for the specific style (ie: grunge, goth, rocker, etc).

Don’t take too much product on your brush. You can always add additional color later; it is much easier to add than subtract color!

If somehow you applied more eyeshadow than you needed and want to dilute it, take a matte light (ecru or nude) eye shadow on a fluffy brush and go along the area you want to make lighter. It will really help you to blend everything. Sometimes light shimmery eyeshadows or pigments can help you even out and blend color even better than matte ones.

Tap off the excess every time you grab the eyeshadow from a pan. It will save you from fallouts.

Don't be afraid of tight lining, it will create a huge difference and will make your lashes look thicker and deeper. It is especially helpful for those with hooded eyes as the skin over the eye will hide the eyeliner. With a hooded eye, you can even skip the eyeliner and go straight for the tight lining instead.
A Few More Tips

Tip 1
If you want any eyeshadow to give you more color and be more opaque, you will look to choose a creamy white base underneath (blended out before the final color eyeshadow application).

Tip 2
If you want your lighter eyeshadow to pop even more, you can use a darker base for them, it can be a brown or black eye pencil, cream eyeshadow, or even a gel liner. One thing that matters is it has to be a cream-based product (so that the eyeshadow sticks to it), and it will also be blended out with a white base.
Tip 3
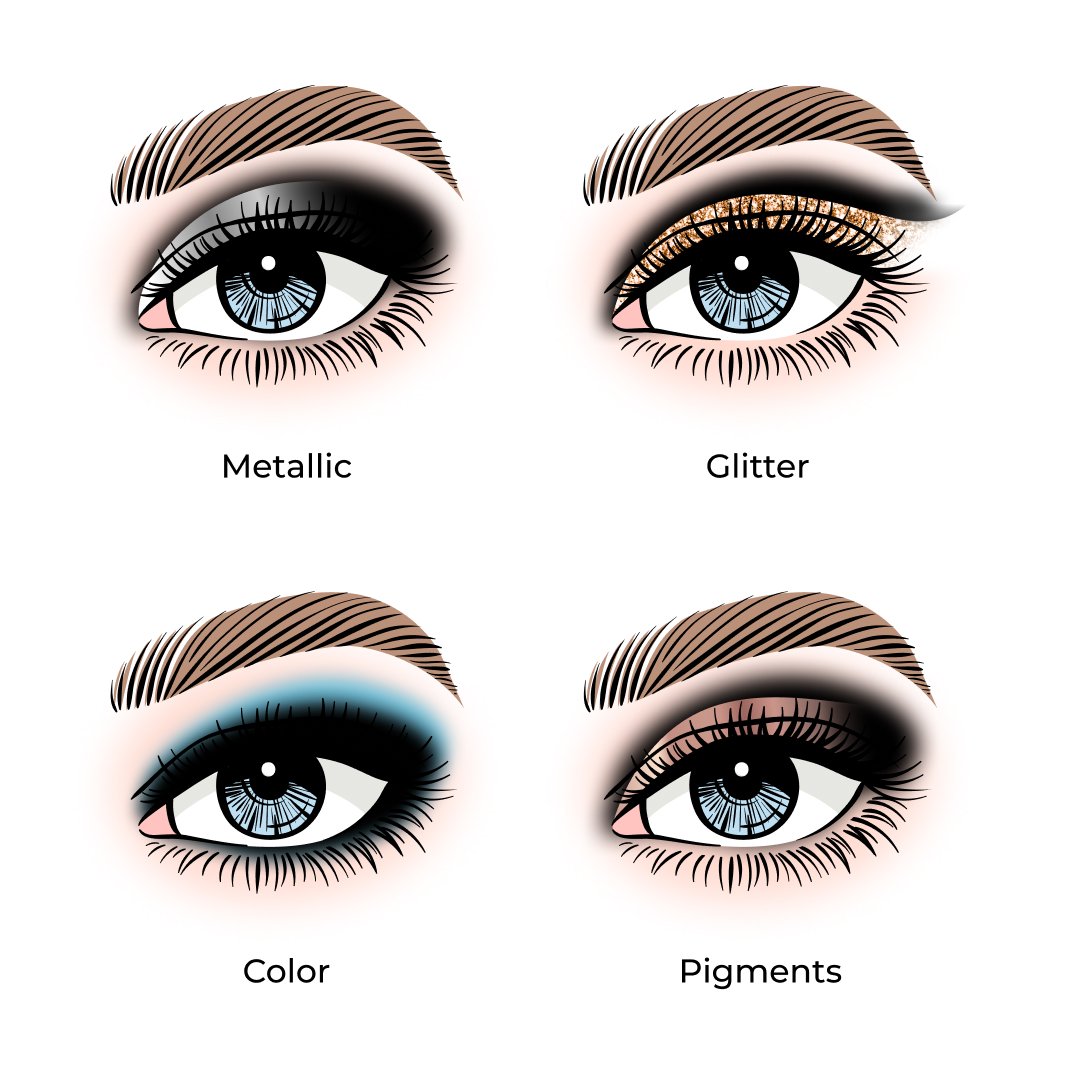
Keep in mind if you use a powder black base, the color will not show up. This trick works especially well if you use metallic or foiled eyeshadows or pigments, or glitter on top of this base.
Precision in makeup comes from calm energy and steady focus. More and more studios and creative businesses invest in corporate wellness programs. Chakra Hours, specializes in bringing on-site yoga and mindfulness sessions to salons, academies, and creative teams; helping entrepreneurs reduce stress and avoid burnout.
Top 10 Mistakes
Mistake #1: Putting too much product on your brush.
This is the number one cause of eye shadow fallout. To avoid it, wet your brush, take a little glitter, and gently press it into the areas you want.

Mistake #2: Not using a primer before applying powder eye shadow.
Primer serves many purposes, including moisturizing dry lids, helping shadow stay on longer, and preventing loose shadow from falling on your cheeks. You can use a fragrance-free lip balm, salve, or eye cream as a substitute if you don't want to purchase a separate primer.

Mistake #3: Applying concealer to your lids before shadow.
Concealer can be too cakey, which changes the color of the eye shadow and doesn't look good.

Mistake #4: Buying nude shades that "match" your skin tone.
You're better off reaching for something metallic to make your eyes stand out.
Mistake #5: Skipping shadow underneath your eyes.
Putting shadow on the small lid underneath your eyes can complete your look. Use a small tapered brow brush to get in that delicate area, and then take the color you're using back up to the crease in a sideways V-shape for a messy but put-together look.

Mistake #6: Limiting your eye makeup to traditional eye shadow products only.
We suggest experimenting with other types of makeup to add depth and dimension to your lids. For example, try using wet blush to create a sunset-inspired look, or use your bronzer to add a sun-kissed effect. And don't be afraid to play around with different textures and finishes, like using a highlighter to add a subtle shimmer to your lids.

Mistake #7: Applying eye makeup before foundation.
It's best to apply foundation before any eye makeup so that your skin looks perfect and you don't have to use multiple eye shadows.
Mistake #8: Using only a makeup brush to apply eye shadow.
Your fingers are your greatest secret weapon and can do a lot of things that even fancy brushes can't. Please note: as a response to the COVID pandemic, safety protocols have been implemented that involve obtaining client consent and visibly sanitizing hands before providing services.
Mistake #9: Thinking you need four different shades of eye shadow for a proper look.
You can get away with using just one shadow shade.
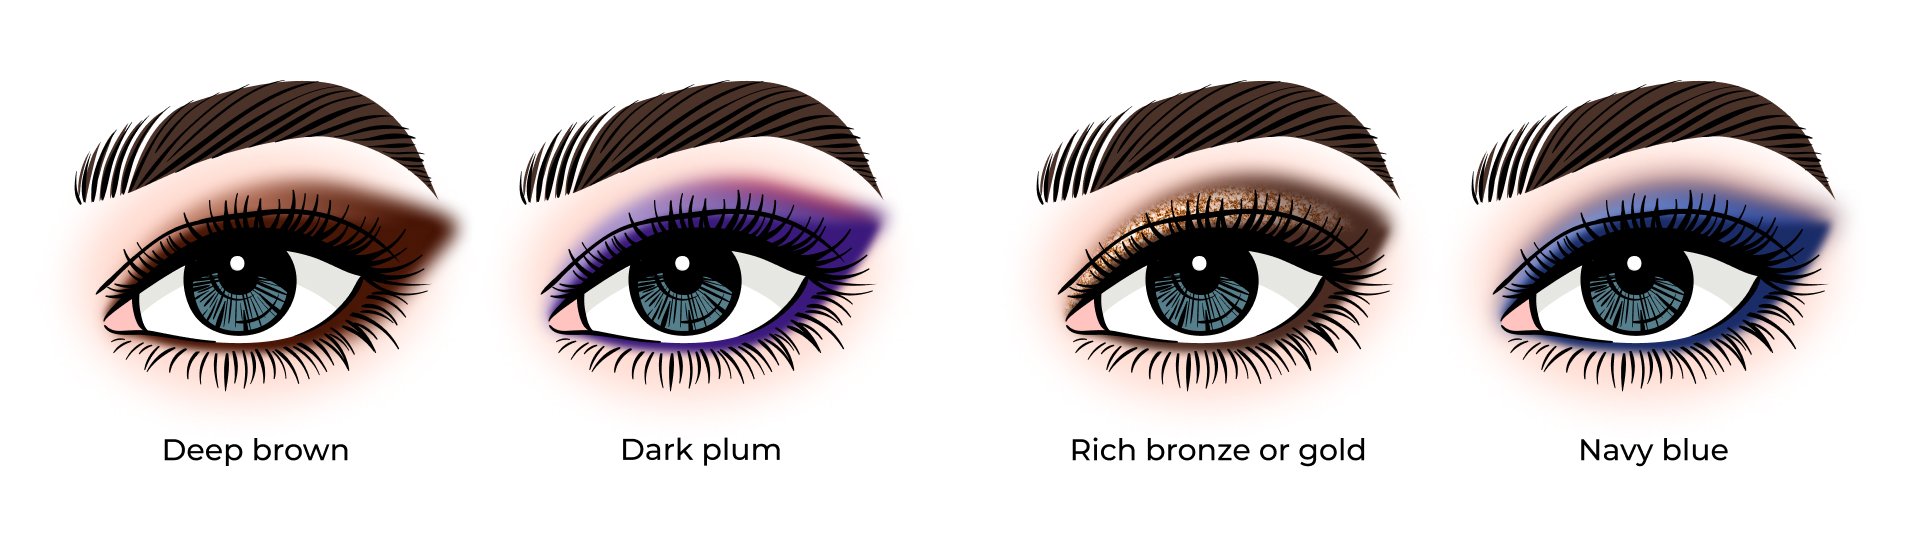
Mistake #10: Using black eye shadow to create a smoky eye.
A smoky eye can come from many different colors, such as a subtle brown, dark gray, or plums and navy shades.
Be creative, experiment with different techniques, and find what works best for you and your eye shape and color! Once you’ve perfected these techniques, it will take less than 10 minutes to perfectly blend your eyeshadows and make your eyes beautifully stand out!